R.I.P, Toontown! :'-(
quinta-feira, 22 de agosto de 2013
The end
Before I start, I'd like to apologize for not posting for so long. I've been really busy with tests and other school stuff. Anyways, I'm posting now because our beloved game, Toontown, will end. Toontown's official website has confirmed the information. According to them, the game will end because they're now focusing on other Disney products. Until the game's end, every player will be able to play as a member. I'm really sad about that, because this has already happened to me before. Brazil's Toontown was closed two years ago, and that was what made me play in the U.S. Toontown. Toontown will be shut down at 11:59 AM Pacific time in September 19, 2013. You can still submit codes for items/jellybeans; they'll work, but keep in mind that after 11:59 AM Pacific time in September 19, 2013, Toontown will be OVER. All Toons will be deleted and you'll no longer be able to log in to your account. If you are currently a member, stay calm, because an e-mail will be sent by Toontown's support people informing you about the closing and offering refund options. Since this blog was exclusively about Toontown, I'm closing it too. Thanks for all of you who read what I wrote here, despite not commenting or following me. And that's it, guys. For all Toons, know you'll be missed deeply. Toontown was a part of our lives and, for serious players, will never be forgotten. Finally, with deep sorrow, I'd like to say...
domingo, 14 de julho de 2013
Toontown's districts
Toontown has several districts. A district is an identical copy of the Toontown world. Currently, we have 30 districts (excluding Welcome Valley). You can wonder why so many. Well, this was made so that it was easier to avoid technical problems that would occur often if everyone played in the same district. Back in the times of Brazil's Toontown, since there were no updates, everyone played together in the same district. The consequences were severe; connection problems were constant (for you to have an idea, it was difficult to play for 10 minutes without getting disconnected), what caused many players to leave Toontown. In order to make playing easier, there are multiple districts. Having more districts also helps one to avoid lag or harassing players.
Currently, the districts are:
-Boingy Acres
-Boingy Bay
-Boingy Summit
-Boingyboro
-Bouncy Summit
-Crazy Grove
-Crazy Hills
-Crazyham
-Funnyfield
-Giggly Bay
-Giggly Grove
-Giggly Hills
-Giggly Point
-Gigglyfield
-Gigglyham
-Goofy Valley
-Goofyport
-Kooky Grove
-Kookyboro
-Loopy Harbor
-Nutty Hills
-Nutty River
-Nutty Summit
-Nuttyville
-Nuttywood
-Silly Rapids
-Silly Valley
-Sillyham
-Toon Valley
-Zany Acres
Districts vary greatly in terms of number of number of Toons and frequency of Cog Invasions, for example. Three districts are the most popular, and they are:
-Nutty River
-Nutty Summit
-Toon Valley
Normally, the Toon Valley district is crowded in the Toontown Central playground. Nutty Summit is the second most popular district, overshadowed only by Nutty River. Here, since there are crowds in many places, it's easy to complete Toontasks and get promotions. It's easy to find Toons to help you with Toontasks that involve, for example, defeating a large number of Cogs or a large Cog building. This district is usually quiet in the early morning but gets full by the afternoon. Some of the main differences from Nutty River are:
-Invasions are far less common;
-The district opens up every once in a while.
Finally, we have Nutty River. This district is by far the most crowded, and the crowds tend to form more often in the middle of Donald's Dreamland. The reason is that in this district, many Toons use phrases that give jellybeans or restock gags. This district is almost constantly full, thus, normally, the only way of entering it is teleporting to someone that's already inside. It's also popular because of it's nearly constant Cog invasions, which make it the best place to get gags quickly. Not everything is good here though; being the fullest district, it's target to many hackers. Because of that, the district resets multiple times a day by people that normally haven't been given authority to do so. Also, the massive amount of Toons gathering in the same place may severely slow down your game.
You can change districts by using the District page in the Shticker book, and you can also check how crowded it is by looking at the circular icons by the side of every district. Blue means quiet, green means ideal and red means full.
A Quiet district will have a population ranging from 0 to 399 Toons, an Ideal district will have a population ranging from 400 to 599 Toons, and a Full district has at least 600 Toons in it (in districts like Nutty River, the number of Toons far exceeds 600).
Here's some advice:
-Don't play in crowded district while looking for a specific kind of Cog, because there's a high chance there'll be an invasion;
-Beware of the danger of reseting in Nutty River. Avoid engaging in activities that take a long time to be done, like Boss Cog battles or cog facilities like The Back Nine, because you may be disconnected.
Finally, sometimes Mega Cog Invasions occur. In these invasions, the same type of Cog invades all districts but a few, called Safe Districts. The Safe Districts are:
-Crazy Grove
-Gigglyfield
-Giggly Hills
-Goofy Valley
-Silly Valley
-Zany Acres
Hope this helped ya!
Spirit :-)
sexta-feira, 28 de junho de 2013
Laff Points and Laff Meter
The Laff Points are your Toon's "life points". You can always check your Laff Points in the Laff Meter, a meter that, while you're outside of battles, stays on the lower left corner of the screen. When you enter a battle, your Laff Meter will stay above your Toon's head.
While doing ToonTasks, you'll sometimes see tasks that have "x" Point Laff Boost (x may be 1, 2, or 3) as a reward. These tasks reward you by increasing your Laff Limit (max Laff) when completed. Every Toon starts with 15 Laff, and the current max limit is 137 Laff. Whenever your Laff drops to zero, you'll go "sad": when this happens, instead of showing your Toon's face with the normal colors smiling, fully or partially, will show a green face with Xs for the eyes and a tongue sticking out of the sad mouth. When a Toon is sad, it cannot leave the playground, ride the Trolley or fish before the Laff Meter shows at least 1 Laff. Your Laff will gradually recover if you stay in the playground, but you can always accelerate this by picking up "treasures" in the playground (ice cream cones in Toontown Central, stars in Donald's Dock, flowers in Daisy Gardens, musical notes in Minnies Melodyland, snowflakes in The Brrrgh, "ZZZ" in Donald's Dreamland, and nuts in Chip N Dale's Acorn Acres). Also, when you go sad, you lose all the gags you were carrying. Doing ToonTasks isn't the only way of increasing your Laff: fishing trophies, gardening trophies, Goofy Speedway's trophies, golfing trophies and maxed out Cog Disguises are all ways of getting more Laff.

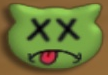
A healthy Toon will have a A sad Toon's Laff Meter
full Laff Meter. will be like this.
This is the list of activities that allow you to max out your Laff Meter:
-Completing Toontown Central: you'll get 10 Laff Points after completing every Laff Boost task in this neighbourhood (what leaves you with 25 total Laff);
-Completing Donald's Dock: you'll get 9 Laff Points after completing every Laff Boost task in this neighbourhood (what leaves you with 34 total Laff);
-Completing Daisy Gardens: you'll get 9 Laff Points after completing every Laff Boost task in this neighbourhood (what leaves you with 43 total Laff);
-Completing Minnie's Melodyland: you'll get 9 Laff Points after completing every Laff Boost task in this neighbourhood (what leaves you with 52 total Laff);
-Completing The Brrrgh: you'll get 9 Laff Points after completing every Laff Boost task in this neighbourhood (what leaves you with 61 total Laff);
-Completing Donald's Dreamland: you'll get 39 Laff Points after completing every Laff Boost task in this neighbourhood (what leaves you with 100 total Laff);
-Getting all 70 fish species: you'll get one point Laff Boost for every 10 species you fish. Getting them all leaves you with 107 total Laff;
-Getting all gardening trophies: you'll get 4 Laff Points in total with all gardening trophies, what leaves you with 111 total Laff;
-Getting all Goofy Speedway trophies: you'll get 3 Laff Points in total with all Goofy Speedway trophies, what leaves you with 114 total Laff;
-Getting all golfing trophies: you'll get 3 Laff Points in total with all golfing trophies, what leaves you with 117 total Laff;
-Maxed Sellbot Cog Disguise: you'll get 5 Laff Points in total for maxing this Cog Disguise, what leaves you with 122 total Laff;
-Maxed Cashbot Cog Disguise: you'll get 5 Laff Points in total for maxing this Cog Disguise, what leaves you with 127 total Laff;
-Maxed Lawbot Cog Disguise: you'll get 5 Laff Points in total for maxing this Cog Disguise, what leaves you with 132 total Laff;
-Maxed Bossbot Cog Disguise: you'll get 5 Laff Points in total for maxing this Cog Disguise, what leaves you with the current maximum Laff limit, 137.
Recovering Laff Points:
There are multiple ways to heal your Toon after or during a battle:
-Walking around the playground: a Toon regains one Laff Point every thirty seconds;
-Receiving a Toon-up from another Toon in battle;
-Collecting the treasures scattered around the playground;
-Turning in a finished ToonTask (you'll have all of your Laff Points healed by performing this action);
-Having Doodles perform tricks successfully;
-While playing with Estate Cannons, Toon-up targets occasionally appear. By shooting themselves at these targets, Toons regain a certain number of Laff Points. This number doubles each time the target is hit.
During fights against a Cog Boss, there are also ways (Toon-up counts, but won't be listed here) of regaining your health:
-In fights against the Vice President (V.P.), during the Pie Round, Toons hit by Whole Cream Pies will recover Laff Points. A Toon regains one laff Point each time he/she is hit by a Whole Cream Pie;
-In fights against the Chief Financial Officer (CFO), Toons can make treasures appear by stomping on the goons;
-In fights against the Chief Justice (CJ), Toons can heal others by throwing evidences at them. These evidences can heal up to 5 Laff;
-In fights against the Chief Executive Officer, two conveyor belts will release "snacks" that can heal up to 4 Laff.
Restricted Areas:
Some places (which are all Cog facilities) require a certain number of Laff to be accessed. Weaker Toons are prevented from entering these areas. Once they get enough Laff to fulfill the requirements, they may enter.
-The Sellbot Factory Side Entrance requires 34 Laff Points to be accessed;
-The Cashbot HQ possesses two restricted areas: the Dollar Mint, which requires 69 Laff Points to be accessed, and the Bullion Mint, which requires 74 Laff Points to be accessed;
-The District Attorney's Office in the Lawbot HQ possesses three restricted areas: Office B, Office C, and Office D. Office B requires 84 Laff Points to be accessed, Office C requires 89 Laff Points to be accessed, and Office D requires 94 Laff Points to be accessed;
-The Bossbot HQ possesses two restricted areas: The Middle Six and The Back Nine. The Middle Six requires 104 Laff to be accessed, and The Back Nine requires 106 Laff to be accessed.
Losing Laff Points:
A Toon can also lose Laff in multiple ways:
-Being hit by a Cog Attack will take away some Laff;
-Being caught by a searchlight will cause a Toon to lose some Laff;
-In the Sellbot Factory, falling inside the lava will take away 2 Laff Points;
-In the Cashbot Mints, being hit by a stomper will take away 3-10 Laff Points;
-In any of the District Attorney's Offices, there are spotlights that take away 8-10 Laff Points;
-In any of the Cog Golf Courses, failing to finish puzzles will take away 20 Laff Points.
Hope this helped ya!
Spirit :-)
While doing ToonTasks, you'll sometimes see tasks that have "x" Point Laff Boost (x may be 1, 2, or 3) as a reward. These tasks reward you by increasing your Laff Limit (max Laff) when completed. Every Toon starts with 15 Laff, and the current max limit is 137 Laff. Whenever your Laff drops to zero, you'll go "sad": when this happens, instead of showing your Toon's face with the normal colors smiling, fully or partially, will show a green face with Xs for the eyes and a tongue sticking out of the sad mouth. When a Toon is sad, it cannot leave the playground, ride the Trolley or fish before the Laff Meter shows at least 1 Laff. Your Laff will gradually recover if you stay in the playground, but you can always accelerate this by picking up "treasures" in the playground (ice cream cones in Toontown Central, stars in Donald's Dock, flowers in Daisy Gardens, musical notes in Minnies Melodyland, snowflakes in The Brrrgh, "ZZZ" in Donald's Dreamland, and nuts in Chip N Dale's Acorn Acres). Also, when you go sad, you lose all the gags you were carrying. Doing ToonTasks isn't the only way of increasing your Laff: fishing trophies, gardening trophies, Goofy Speedway's trophies, golfing trophies and maxed out Cog Disguises are all ways of getting more Laff.
A healthy Toon will have a A sad Toon's Laff Meter
full Laff Meter. will be like this.
This is the list of activities that allow you to max out your Laff Meter:
-Completing Toontown Central: you'll get 10 Laff Points after completing every Laff Boost task in this neighbourhood (what leaves you with 25 total Laff);
-Completing Donald's Dock: you'll get 9 Laff Points after completing every Laff Boost task in this neighbourhood (what leaves you with 34 total Laff);
-Completing Daisy Gardens: you'll get 9 Laff Points after completing every Laff Boost task in this neighbourhood (what leaves you with 43 total Laff);
-Completing Minnie's Melodyland: you'll get 9 Laff Points after completing every Laff Boost task in this neighbourhood (what leaves you with 52 total Laff);
-Completing The Brrrgh: you'll get 9 Laff Points after completing every Laff Boost task in this neighbourhood (what leaves you with 61 total Laff);
-Completing Donald's Dreamland: you'll get 39 Laff Points after completing every Laff Boost task in this neighbourhood (what leaves you with 100 total Laff);
-Getting all 70 fish species: you'll get one point Laff Boost for every 10 species you fish. Getting them all leaves you with 107 total Laff;
-Getting all gardening trophies: you'll get 4 Laff Points in total with all gardening trophies, what leaves you with 111 total Laff;
-Getting all Goofy Speedway trophies: you'll get 3 Laff Points in total with all Goofy Speedway trophies, what leaves you with 114 total Laff;
-Getting all golfing trophies: you'll get 3 Laff Points in total with all golfing trophies, what leaves you with 117 total Laff;
-Maxed Sellbot Cog Disguise: you'll get 5 Laff Points in total for maxing this Cog Disguise, what leaves you with 122 total Laff;
-Maxed Cashbot Cog Disguise: you'll get 5 Laff Points in total for maxing this Cog Disguise, what leaves you with 127 total Laff;
-Maxed Lawbot Cog Disguise: you'll get 5 Laff Points in total for maxing this Cog Disguise, what leaves you with 132 total Laff;
-Maxed Bossbot Cog Disguise: you'll get 5 Laff Points in total for maxing this Cog Disguise, what leaves you with the current maximum Laff limit, 137.
Recovering Laff Points:
There are multiple ways to heal your Toon after or during a battle:
-Walking around the playground: a Toon regains one Laff Point every thirty seconds;
-Receiving a Toon-up from another Toon in battle;
-Collecting the treasures scattered around the playground;
-Turning in a finished ToonTask (you'll have all of your Laff Points healed by performing this action);
-Having Doodles perform tricks successfully;
-While playing with Estate Cannons, Toon-up targets occasionally appear. By shooting themselves at these targets, Toons regain a certain number of Laff Points. This number doubles each time the target is hit.
During fights against a Cog Boss, there are also ways (Toon-up counts, but won't be listed here) of regaining your health:
-In fights against the Vice President (V.P.), during the Pie Round, Toons hit by Whole Cream Pies will recover Laff Points. A Toon regains one laff Point each time he/she is hit by a Whole Cream Pie;
-In fights against the Chief Financial Officer (CFO), Toons can make treasures appear by stomping on the goons;
-In fights against the Chief Justice (CJ), Toons can heal others by throwing evidences at them. These evidences can heal up to 5 Laff;
-In fights against the Chief Executive Officer, two conveyor belts will release "snacks" that can heal up to 4 Laff.
Restricted Areas:
Some places (which are all Cog facilities) require a certain number of Laff to be accessed. Weaker Toons are prevented from entering these areas. Once they get enough Laff to fulfill the requirements, they may enter.
-The Sellbot Factory Side Entrance requires 34 Laff Points to be accessed;
-The Cashbot HQ possesses two restricted areas: the Dollar Mint, which requires 69 Laff Points to be accessed, and the Bullion Mint, which requires 74 Laff Points to be accessed;
-The District Attorney's Office in the Lawbot HQ possesses three restricted areas: Office B, Office C, and Office D. Office B requires 84 Laff Points to be accessed, Office C requires 89 Laff Points to be accessed, and Office D requires 94 Laff Points to be accessed;
-The Bossbot HQ possesses two restricted areas: The Middle Six and The Back Nine. The Middle Six requires 104 Laff to be accessed, and The Back Nine requires 106 Laff to be accessed.
Losing Laff Points:
A Toon can also lose Laff in multiple ways:
-Being hit by a Cog Attack will take away some Laff;
-Being caught by a searchlight will cause a Toon to lose some Laff;
-In the Sellbot Factory, falling inside the lava will take away 2 Laff Points;
-In the Cashbot Mints, being hit by a stomper will take away 3-10 Laff Points;
-In any of the District Attorney's Offices, there are spotlights that take away 8-10 Laff Points;
-In any of the Cog Golf Courses, failing to finish puzzles will take away 20 Laff Points.
Hope this helped ya!
Spirit :-)
quarta-feira, 19 de junho de 2013
Gags
The Gags are your weapons in the fights against the cogs. They're divided in categories, called Tracks. There are seven tracks, each one with seven gags. Of the 49, you can only get 42 per Toon, so choose wisely which ones you'll want. Of the seven tracks, two are "forced": you're obligated to have Squirt and Throw. The gags vary in power and accuracy, being Trap the strongest type and Sound, the weakest type. The most accurate gags are the Sound and Squirt tracks, while the least accurate ones are the Drop and Lure tracks.
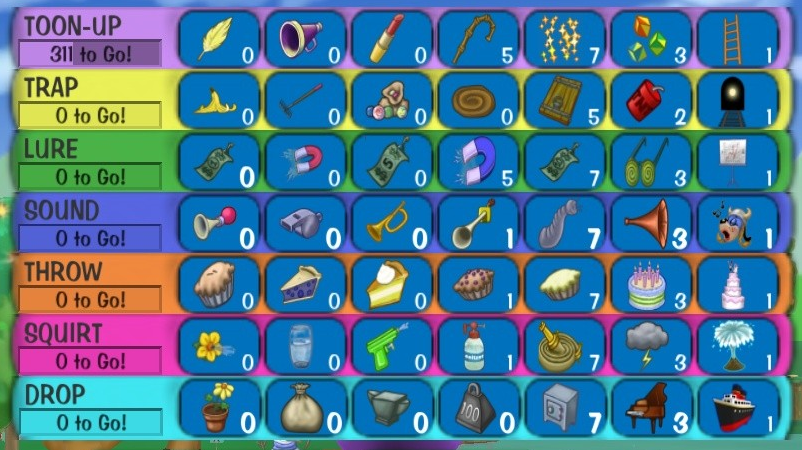
All gags. It isn't possible to get them all, this is a representative image.
Now I'll explain the effects of the gags in each track. In a battle, the gags will be used according to their order in this image, Toon-up being the first one to be used and Drop being the last one.
Toon-up: these gags allow you to heal other Toons in battle. If you use a Toon-up gag in a Toon with a full Laff Meter, you won't get any experience. The gags in this track are:
-Feather: targets one Toon. Heals up to 10 Laff Points. Experience required to get it: none. If you train for the Toon-up gag track, you'll automatically get this gag as soon as you finish the training.
-Megaphone: targets all Toons (excluding the player). Heals up to 18 Laff Points. Experience required to get this gag: 20 points.
-Lipstick: targets one Toon. Heals up to 30 Laff Points. Experience required to get this gag: 200 points.
-Bamboo Cane: targets all allies. Heals up to 45 Laff Points. Experience required to get this gag: 800 points.
-Pixie Dust: targets one Toon. Heals up to 70 Laff Points. Experience required to get this gag: 2000 points.
-Juggling Balls: targets all allies. Heals up to 120 Laff Points. Experience required to get this gag: 6000 points.
-High Dive: the ultimate Toon-up gag. Heals up to 210 Laff Points, and targets all allies. Experience points required to get this gag: 10.000 points (to obtain it for the first time)/ 500 points (in order to get this gag again, you need to get 500 points or plant it in your garden)
Trap: these gags will damage cogs that step on them. However, the cogs need to be lured to make trap gags work. You cannot use Trap gags on cogs that are already lured. The gags in this track are:
-Banana Peel: targets one Cog. Max damage: 12. Experience points required to get this gag: none. Being the first gag in the Trap gag track, it will be given to you as soon as you finish the training for this track.
-Rake: targets one Cog. Max damage: 20. Experience required to get this gag: 20 points.
-Marbles: targets one Cog. Max damage: 35. Experience required to get this gag: 100 points.
-Quicksand: targets one Cog. Max damage: 50. Experience required to get this gag: 800 points.
-Trapdoor: targets one Cog. Max damage: 70. Experience required to get this gag: 2000 points.
-TNT: targets one Cog. Max damage: 180. Experience required to get this gag: 6000 points.
-Train Track: targets all cogs. Max damage: 195. Experience required to get this gag: 10.000 points (first time)/ 500 points (whenever you want to get it again).
Lure: these gags have low accuracy, and are the only gags in the game that have a more defensive purpose: Cogs that have been lured are unable to attack! However, the effects don't last forever; if you wait for too long, the Cog will wake up and attack. The gags in this track are:
-$1 Bill: targets one Cog. Effect lasts for 2 rounds (if it works). Experience required to get this gag: none. You'll get this gag as soon as you finish the training for this track.
-Small Magnet: targets all Cogs. Effect lasts for 2 rounds (if it works). Experience required to get this gag: 20 points.
-$5 Bill: targets one Cog. Effect lasts for 3 rounds (if it works). Experience required to get this gag: 100 points.
-Big Magnet: targets all Cogs. Effect lasts for 3 rounds (if it works). Experience required to get this gag: 800 points.
-$10 Bill: targets one Cog. Effect lasts for 4 rounds (if it works). Experience required to get this gag: 2000 points.
-Hypno-goggles: targets all Cogs. Effect lasts for 4 rounds (if it works). Experience required to get this gag: 6000 points.
-Presentation: targets all Cogs. Effect lasts for 15 rounds (if it works). Experience required to get this gag: 10.000 points (first time)/ 500 points (second time and onwards).
Sound: this track is special because all of the gags in it target every Cog in battle. However, they have a drawback: they have very low power. The gags in this track are:
-Bike Horn: max damage: 4. Experience required to get this gag: none. You'll get this gag as soon as you finish the training for this track.
-Whistle: max damage: 7. Experience required to get this gag: 40 points.
-Bugle: max damage: 11. Experience required to get this gag: 200 points.
-Aoogah: max damage: 16. Experience required to get this gag: 1000 points.
-Elephant: max damage: 21. Experience required to get this gag: 2500 points.
-Fog Horn: max damage: 50. Experience required to get this gag: 7500 points.
-Opera Voice: max damage: 90. Experience required to get this gag: 10.000 points (first time)/ 500 points (second time and onwards).
Throw: these gags have a high power, but a medium accuracy. Throw and Squirt are the two tracks you're obligated to have.
-Cupcake: targets one Cog. Max damage: 6. Experience required to get this gag: none. Every new Toon automatically gets access to this gag.
-Fruit Pie Slice: targets one Cog. Max damage: 10. Experience required to get this gag: 10 points.
-Cream Pie Slice: targets one Cog. Max damage: 17. Experience required to get this gag: 50 points.
-Whole Fruit Pie: targets one Cog. Max damage: 27. Experience required to get this gag: 400 points.
-Whole Cream Pie: targets one Cog. Max damage: 40. Experience required to get this gag: 2000 points.
-Birthday Cake: targets one Cog. Max damage: 100. Experience required to get this gag: 6000 points.
-Wedding Cake: targets all Cogs. Max damage: 120. Experience required to get this gag: 10.000 points (first time)/ 500 points (second time and onwards).
Squirt: these gags have a higher accuracy (but a lower power) than Throw. Because of this, most players in earlier stages of the game (or even those that are around the middle of it) have more advanced gags in the Throw track than in the Squirt track. Throw and Squirt are the two tracks you're obligated to have. The gags in this track are:
-Squirting Flower: targets one Cog. Max damage: 4. Experience required to get this gag: none. Every new Toon automatically gets access to this gag.
-Glass of Water: targets one Cog. Max damage: 8. Experience required to get this gag: 10 points.
-Squirt Gun: targets one Cog. Max damage: 12. Experience required to get this gag: 50 points.
-Seltzer Bottle: targets one Cog. Max damage: 21. Experience required to get this gag: 400 points.
-Fire Hose: targets one Cog. Max damage: 30. Experience required to get this gag: 2.000 points.
-Storm Cloud: targets one Cog. Max damage: 80. Experience required to get this gag: 6.000 points.
-Geyser: targets one Cog. Max damage: 105. Experience required to get this gag: 10.000 points (first time)/ 500 points (second time and onwards).
Drop: last but not least, we have the Drop gag track. These gags are even more powerful than Throw, losing only to Trap in terms of power. Sadly, this comes with a drawback. Like the Lure gags, Drop gags are very likely to miss. The gags on this track are:
-Flower Pot: targets one Cog. Max damage: 10. Experience required to get this gag: none. You'll get this gag as soon as you finish the training for this track.
-Sandbag: targets one Cog. Max damage: 18. Experience required to get this gag: 20 points.
-Anvil: targets one Cog. Max damage: 30. Experience required to get this gag: 100 points.
-Big Weight: targets one Cog. Max damage: 45. Experience required to get this gag: 500 points.
-Safe: targets one Cog. Max damage: 60. Experience required to get this gag: 2000 points.
-Grand Piano: targets one Cog. Max damage: 170. Experience required to get this gag: 6.000 gags.
-Ocean Liner: targets one Cog. Max damage: 180. Experience required to get this gag: 10.000 points (first time)/ 500 points (second time and onwards).
Curiosities and observations:
-Drop gags will always miss lured Cogs;
-Don't use Sound gags on lured Cogs; they will wake the Cogs up;
-Trap gags are the only gags to have a perfect accuracy. However, they're also the only gags to depend on other gags in order to work;
-If you put two Trap gags in front of the same Cog, both will be cancelled;
-Using other damaging gags before a Drop gag improves its chances of hitting in the same round;
-Sound gags are the weakest gags; however, the Sound gag track is the only track in which all gags target all Cogs;
-Whenever you use damaging gags in lured cogs, you'll inflict extra damage.
Hope this helped ya!
Spirit :-)
terça-feira, 18 de junho de 2013
The game
Hi there!
Toontown is a virtual world. Your objective is mainly help destroy the evil robots, known as Cogs, that are trying to take over Toontown and make it a sad and ugly place. Of course, you can do much more than explode cogs; you can ride the Trolley in order to get jellybeans, Toontown's currency; you can buy a Doodle and play with it at your Estate; you can fish alone or with your friends in ponds all over Toontown, and, finally, you can hold parties that can be public or private.
In the Toontown world, you play as an animal. The options to choose from are Cat, Dog, Mouse, Horse, Monkey, Rabbit, Bear, Pig, and Duck. You can then choose your colors, clothes, and size. After this, you choose a name for your toon. You can create a name from pre-chosen words, or you can type a name; however, keep in mind that it must be approved by the Toon Council before being used.
You also have a Friends List. You can have up to 50 friends, and you can only be True Friends with someone if you're a member. You can chat with other Toons by using two buttons: the SpeedChat (green button) and the SpeedChat Plus (the blue button). These buttons are in the upper left corner of the screen. You must enable the use of the SpeedChat Plus if you want to type messages to other Toons. If you're using the SpeedChat, you can only speak through the use of pre-chosen phrases, approved by the Toon Council. When you're using the SpeedChat Plus, you can type whatever you want, however, only approved words will be shown to other players. Words that aren't approved will be shown as animal sounds. Also, if you use foul language, you'll get a warning. If you repeatedly make use of foul language, you may get your account and membership (if you have it) suspended/cancelled. The True Friends feature is enabled only for members (it must be activated in the Toontown website before use). It's a feature that allows two players to speak freely, without the limitations of the SpeedChat Plus. However, heavy cursing still won't be tolerated, even when using the True Friends chat. True Friends communicate by typing, and their conversations will appear as animal sounds to other Toons. To become True Friends with someone, you need to type the True Friends Code, a randomly generated short string of numbers and letter that always starts with TT. The code you get for a certain Toon can only be used once and will expire after two days. Also, you can only use that code for that Toon.
The Shticker Book is a small book that is on the lower right corner of the screen. By clicking it, you have access to a lot of things: you can change options (for example, turning on/off the game sounds), exit, type a code in order to get items, go to your Estate, go to the playground (and, after you get teleport access to a neighborhood, you can teleport there by clicking the place), check your fishing bucket and album, check your Cog Disguise and Promotion, see your Gags and ToonTasks, and some other things.
See more on the next posts!
Spirit
Assinar:
Comentários (Atom)